
Connect to Home Computer over SSH through Cloudflare
I need to work on my personal projects outside sometimes, when I need to access to my home computer I use RustDesk, but the key map for Ubuntu and macOS are quite different thus makes the user experience not very well, I do most of the job with command line, so if I can SSH into my computer at home, that would be great, with cloudflare, this can be fulfilled very easily.
I will keep this post short, so the following will not be covered here:
- The domain name is managed with cloudflare
- cloudflared docker service up and running
- cloudflare tunnel has been created
For details on how to do the above will be described later in Make Selfhosted Services Public.
I followed this guide to make ssh works, the different is I prefer command line, so I will use command line as much as possible to save time.
SSH Server Configuration
- Create cloudflare tunnel
cd $HOME/docker/cloudflared docker run -it --rm -v ${PWD}/cloudflared:/home/nonroot/.cloudflared cloudflare/cloudflared:2022.5.1 tunnel login docker run -it --rm -v ${PWD}/cloudflared:/etc/cloudflared/ cloudflare/cloudflared:2022.5.1 tunnel create my-tunnel - Create a CNAME record
docker run -v ${PWD}/cloudflared:/etc/cloudflared cloudflare/cloudflared:2022.5.1 tunnel route dns my-tunnel test.baylabs.cc
- Add ingress rules to cloudflare config: cloudflared/config.yml
tunnel: 1e768a67-1c95-4304-9e9b-fa227455d7ce
credentials-file: /etc/cloudflared/1e768a67-1c95-4304-9e9b-fa227455d7ce.json
warp-routing:
  enabled: true
ingress:
 - hostname: blog.baylabs.cc
   service: http://192.168.0.15:9090
 - hostname: test.baylabs.cc
   service: ssh://192.168.0.15:22
 - service: http_status:404
Don’t forget to restart docker
docker-compose restart
Add Cloudflare Application
Before adding application, a group is required, or create one during the process of adding application.
-
Create Access Groups Launch Cloudflare Zero Trust dashboard, select
Access >> Access Groupsfrom the left panel, then clickAdd a Groupand fill the group configuration like this: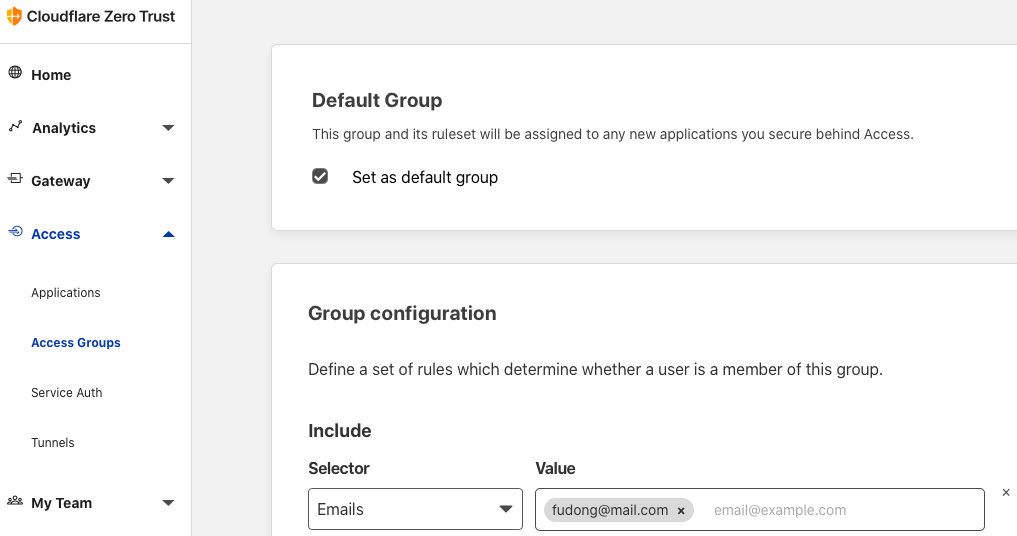
-
Add an application Click
Applications»Add an application»Self-hosted, this is what I did to create an example application:
You may want to change the Session Duration to a longer period, as you need to
enter a new code cloudflare send to your mail box when the session expired, this
could be boring if you use ssh this way every day.
Client configuration
For macOS
brew install cloudflare/cloudflare/cloudflared
For Ubuntu
wget -c https://github.com/cloudflare/cloudflared/releases/latest/download/cloudflared-linux-amd64.deb
sudo dpkg -i ./cloudflared-linux-amd64.deb
cat << EOF >> $HOME/.ssh/config
Host test.baylabs.cc
  ProxyCommand /usr/local/bin/cloudflared access ssh --hostname %h
  User username
EOF
Now it’s time to give it a try:
ssh test.baylabs.cc
You have to grant access when running the above command for the first time.
Troubleshooting
ERR failed to connect to origin error=”websocket: bad handshake”
If ssh connection cannot be established, and report the following error:
ssh test.baylabs.cc
2022-03-27T13:11:48Z ERR failed to connect to origin error="websocket: bad handshake" originURL=https://test.baylabs.cc
websocket: bad handshake
kex_exchange_identification: Connection closed by remote host
Then change
service: ssh://localhost:22
to:
service: ssh://192.168.0.15:22
I don’t know why follow the official guide does not work, but change to the real ip address fix this problem.