
Blink Sketch on ESP8266
Making blink LED working with Arduino on ESP8266 is incredibly easy, with just a few clicks, of course you need to install Arduino IDE first, download the latest version at arduino.cc, as of this writing the latest version is 1.8.13.
Install ESP8266 Arduino Addon
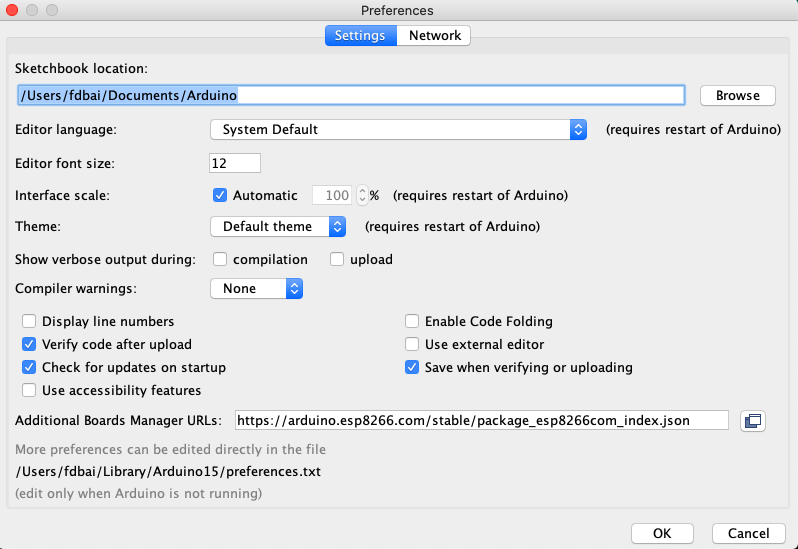
- Launch Arduino and open Preferences window (⌘+,) and enter
https://arduino.esp8266.com/stable/package_esp8266com_index.jsonin Additional Boards Manager URLs text box.
-
Select Tools > Board > Bords Manager, search for esp and click
Install: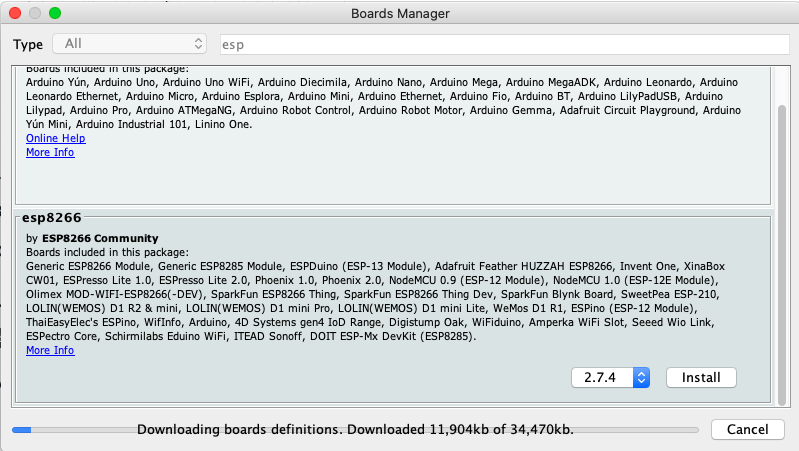
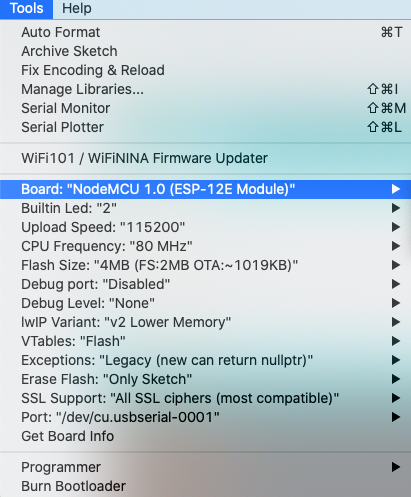
- Select target board in Tools > Board, my ESP board is NodeMCU 1.0:
Blink LED
There are many examples in ESP8266 Arduino Addon, blink led is one of the most simplest one, Open it by selecting File > Examples > ESP8266 > Blink, then click (upload) in the toolbar to upload sketch to esp board.
Executable segment sizes:
IROM   : 228624          - code in flash         (default or ICACHE_FLASH_ATTR)
IRAM   : 26752   / 32768 - code in IRAM          (ICACHE_RAM_ATTR, ISRs...)
DATA   : 1248  )         - initialized variables (global, static) in RAM/HEAP
RODATA : 688   ) / 81920 - constants             (global, static) in RAM/HEAP
BSS    : 24880 )         - zeroed variables      (global, static) in RAM/HEAP
Sketch uses 257312 bytes (24%) of program storage space. Maximum is 1044464 bytes.
Global variables use 26816 bytes (32%) of dynamic memory, leaving 55104 bytes for local variables. Maximum is 81920 bytes.
esptool.py v2.8
Serial port /dev/cu.usbserial-0001
Connecting....
Chip is ESP8266EX
Features: WiFi
Crystal is 26MHz
MAC: 48:3f:da:49:c7:6d
Uploading stub...
Running stub...
Stub running...
Configuring flash size...
Auto-detected Flash size: 4MB
Compressed 261472 bytes to 193123...
Wrote 261472 bytes (193123 compressed) at 0x00000000 in 17.1 seconds (effective 122.5 kbit/s)...
Hash of data verified.

Leaving...
Hard resetting via RTS pin...
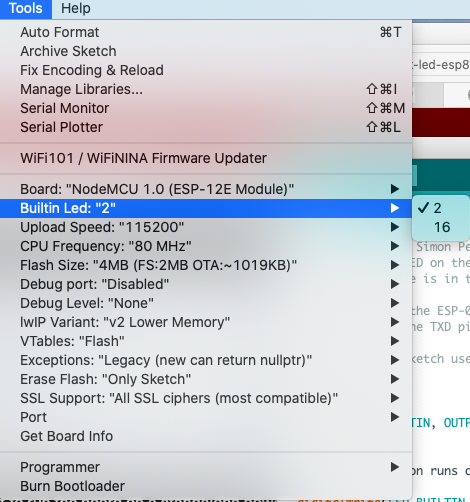
After reset, the builtin LED should blink now, if not, the change the pin number
in Tools > Builtin Led:
Build Sketch without Arduino IDE
makeEspArduino provides a way to build sketch without IDE, this is the best choice for me.
First clone makeEspArduino to your local working directory:
git clone --depth=1 https://github.com/plerup/makeEspArduino.git
Then create a Makefile and include makeEspArduino.mk:
cat << EOF >> Makefile
SKETCH=~/Library/Arduino15/packages/esp8266/hardware/esp8266/2.7.4/libraries/esp8266/examples/Blink/Blink.ino
UPLOAD_PORT=/dev/cu.usbserial-0001
BOARD=nodemcuv2

include makeEspArduino.mk
EOF
The Final step is do make flash, it will compile the sketch and upload firmware
to esp board using esptool.
The board used for demonstration is NodeMCU v1.0, the board name can be found in boards.txt:
nodemcuv2.name=NodeMCU 1.0 (ESP-12E Module)
or you can find it in the following file after ESP8266 Addon installed:
~/Library/Arduino15/packages/esp8266/hardware/esp8266/2.7.4/boards.txt
The official documentation is hosted in readthedocs, read on.
Build Sketch with Arduino CLI
Build sketch with makeEspArduino is great, but I don’t know how to compile multiple sketches like CaptivePortalAdvanced, so I turn to Arduino CLI, install it with below command:
curl -fsSL https://raw.githubusercontent.com/arduino/arduino-cli/master/install.sh | BINDIR=~/.local/bin sh
Install ESP8266 Arduino Addon
Create Arduino config and add board manager URL to it, the default file
format is yaml:
$ arduino-cli config init
Config file written to: /home/fdbai/.arduino15/arduino-cli.yaml
https://arduino.esp8266.com/stable/package_esp8266com_index.json

$ arduino-cli core update-index
Or update core index with option --additional-urls:
$ arduino-cli core update-index --additional-urls https://arduino.esp8266.com/stable/package_esp8266com_index.json
Then install it with:
$ arduino-cli core install esp8266:esp8266
We should see the installed package with list after ESP8266 Addon installed:
$ arduino-cli core list
ID              Installed Latest Name
esp8266:esp8266 2.7.4     2.7.4  esp8266
All supported boards can be listed with:
$ arduino-cli board listall
Board Name                      FQBN
4D Systems gen4 IoD Range       esp8266:esp8266:gen4iod
Adafruit Feather HUZZAH ESP8266 esp8266:esp8266:huzzah
Amperka WiFi Slot               esp8266:esp8266:wifi_slot
Arduino                         esp8266:esp8266:arduino-esp8266
[...]
NodeMCU 0.9 (ESP-12 Module)     esp8266:esp8266:nodemcu
NodeMCU 1.0 (ESP-12E Module)    esp8266:esp8266:nodemcuv2
[...]
Both nodemcu and v2 version are supported, you can get the details of the board
with board details:
$ arduino-cli board details esp8266:esp8266:nodemcuv2
Build and Install Sketch
$ arduino-cli compile --fqbn esp8266:esp8266:nodemcuv2
Executable segment sizes:
IROM   : 228624          - code in flash         (default or ICACHE_FLASH_ATTR)
IRAM   : 26752   / 32768 - code in IRAM          (ICACHE_RAM_ATTR, ISRs...)
DATA   : 1248  )         - initialized variables (global, static) in RAM/HEAP
RODATA : 688   ) / 81920 - constants             (global, static) in RAM/HEAP
BSS    : 24880 )         - zeroed variables      (global, static) in RAM/HEAP
Sketch uses 257312 bytes (24%) of program storage space. Maximum is 1044464 bytes.
Global variables use 26816 bytes (32%) of dynamic memory, leaving 55104 bytes for local variables. Maximum is 81920 bytes.

$ arduino-cli upload -p /dev/ttyUSB0 --fqbn esp8266:esp8266:nodemcuv2
esptool.py v2.8
Serial port /dev/ttyUSB0
Connecting......
Chip is ESP8266EX
Features: WiFi
Crystal is 26MHz
MAC: 48:3f:da:49:c7:6d
Uploading stub...
Running stub...
Stub running...
Configuring flash size...
Auto-detected Flash size: 4MB
Compressed 261472 bytes to 193131...
Wrote 261472 bytes (193131 compressed) at 0x00000000 in 17.5 seconds (effective 119.8 kbit/s)...
Hash of data verified.

Leaving...
Hard resetting via RTS pin...
FQBN means: Fully qualified board name used to identify the board to machines.
To get familiar with CLI, Head to Getting started for more.
OTA
Currently, upload sketch over the air is not natively supported, but there
is a python script in ESP8266 Arduino Addon which can be used to upload firmware
to board, you can find the firmware binary in the directory started with /tmp/arduino-sketch-xxx:
python3 ~/.arduino15/packages/esp8266/hardware/esp8266/2.7.4/tools/espota.py -d -i ip.add.re.ss -f /tmp/arduino-sketch-6A749693062E2290BA5A7F972FD14200/Blink.ino.bin
Build Sketch with PlatformIO Core (CLI)
Another way to compile sketch is using platformio, platformio seems promising, it support frameworks such as Arduino, CMSIS, ESP8266 Non-OS/RTOS SDK, FreeRTOS, Zephyr RTOS etc, it provides both UI and command line,
PlatformIO Core is written in Python, it can work without UI, install it with:
$ python3 -m pip install --user platformio
In order to compile sketch with pio a configuration is required, below is an
example used to build Blink:
cat << EOF >> platformio.ini
[env:nodemcuv2]
platform = espressif8266
framework = arduino
board = nodemcuv2
upload_speed = 230400

[env:nodemcu]
platform = espressif8266
framework = arduino
board = nodemcu
upload_speed = 230400
EOF
More options such as SDK version, lwIP variant can be specified in platformio.ini,
refer to Espressif 8266 for more.
Now Compile and Upload to NodeMCU:
$ pio run --target upload --upload-port /dev/ttyUSB0 -e nodemcuv2
If the sketch on board supports OTA, then the USB serial can be replaced with IP address of the target board:
$ pio run --target upload --upload-port ip.add.re.ss -e nodemcuv2