
Wireless debugging with esplink
Serial console is always an very important tool when doing low level development such as kernel or bootloader, the most commonly used are the USB to serial cable powered by ch34x, pl2303 or cp210x etc, its great, the only problem is they all have to be attached to my computer, I don’t like cables, I like everything to be wireless accessible, can I debug without the obstacle of these cables?
The answer is esplink.
esplink is a firmware running on ESP8266 which provides a bridge between UART and computer with wireless network, it also has other features that are useful such as flashing the attached microcontroller, this post will only focused at the part I am interested, the wireless serial bridge.
This is the ESP8266 WiFi module I used:
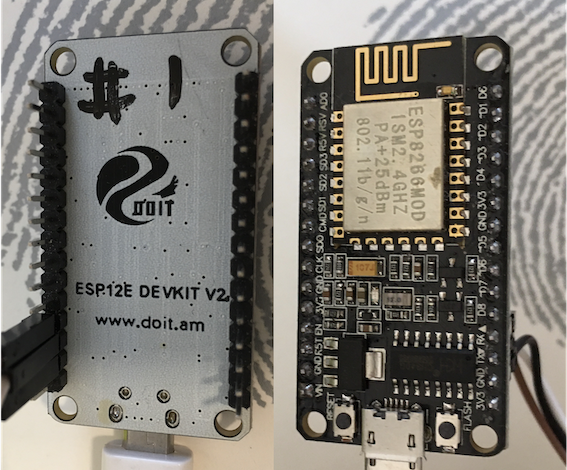
It has 4MB flash on board, the details can be inspected with esptool:
$ python3 -m pip install --user esptool

$ esptool.py flash_id
esptool.py v3.0
Found 1 serial ports
Serial port /dev/ttyUSB0
Connecting....
Detecting chip type... ESP8266
Chip is ESP8266EX
Features: WiFi
Crystal is 26MHz
MAC: 84:0d:8e:aa:2b:f6
Uploading stub...
Running stub...
Stub running...
Manufacturer: ef
Device: 4016
Detected flash size: 4MB
Hard resetting via RTS pin...
Quick Start
The quickest way to get it working is flash the latest release to the
module, download and unpack the tgz file and flash them with esptool.
$ esptool.py --baud 230400 write_flash -fs 4MB -ff 80m \
    0x00000 boot_v1.6.bin 0x1000 user1.bin \
    0x3FC000 esp_init_data_default.bin 0x3FE000 blank.bin
esptool.py v3.0
Found 1 serial ports
Serial port /dev/ttyUSB0
Connecting....
Detecting chip type... ESP8266
Chip is ESP8266EX
Features: WiFi
Crystal is 26MHz
MAC: 84:0d:8e:aa:2b:f6
Uploading stub...
Running stub...
Stub running...
Changing baud rate to 230400
Changed.
Configuring flash size...
Flash params set to 0x004f
Compressed 3856 bytes to 2763...
Wrote 3856 bytes (2763 compressed) at 0x00000000 in 0.1 seconds (effective 244.4 kbit/s)...
Hash of data verified.
Compressed 330756 bytes to 244619...
Wrote 330756 bytes (244619 compressed) at 0x00001000 in 10.8 seconds (effective 245.3 kbit/s)...
Hash of data verified.
Compressed 128 bytes to 75...
Wrote 128 bytes (75 compressed) at 0x003fc000 in 0.0 seconds (effective 128.4 kbit/s)...
Hash of data verified.
Compressed 4096 bytes to 26...
Wrote 4096 bytes (26 compressed) at 0x003fe000 in 0.0 seconds (effective 5776.7 kbit/s)...
Hash of data verified.

Leaving...
Hard resetting via RTS pin...
NOTE:
In case the module cannot work as expected, try to add -fm dio when do flashing.
This is the boot log after reset:
   137> ** esp-link v3.0.14-g963ffbb
   137> Flash config restore ok
   137> CONN led=0
   137> SER led=14
   139> Wifi init, mode=AP+STA
   141> Wifi uses DHCP, hostname=esp-link
   145> "ip": "0.0.0.0"
   147> "netmask": "0.0.0.0"
   150> "gateway": "0.0.0.0"
   152> "hostname": "esp-link"
   155> sleep enable,type: 2
   158> Httpd init, conn=0x3fff3820
   161> No user file system found!
   164> Serbridge pins: reset=12 isp=13 swap=0
   177> Reset cause: 6=external
   177> exccause=0 epc1=0x0 epc2=0x0 epc3=0x0 excvaddr=0x0 depc=0x0
   177> Flash map 4MB:512/512, manuf 0xEF chip 0x4016
   182> ** esp-link v3.0.14-g963ffbb: ready, heap=21368
   187> SNTP timesource set to us.pool.ntp.org with offset 0
   192> initializing user application
   196> Waiting for work to do...
   199> mode : sta(84:0d:8e:aa:2b:f6) + softAP(86:0d:8e:aa:2b:f6)
   205> add if0
   206> add if1
   208> dhcp server start:(ip:192.168.4.1,mask:255.255.255.0,gw:192.168.4.1)
   215> bcn 100
 15158> Wifi check: mode=AP+STA status=0
 15158> Enabling/continuing uart log
Connect esplink to Raspberry Pi
The pinout of rpi and esp8266 wifi module are as follows:
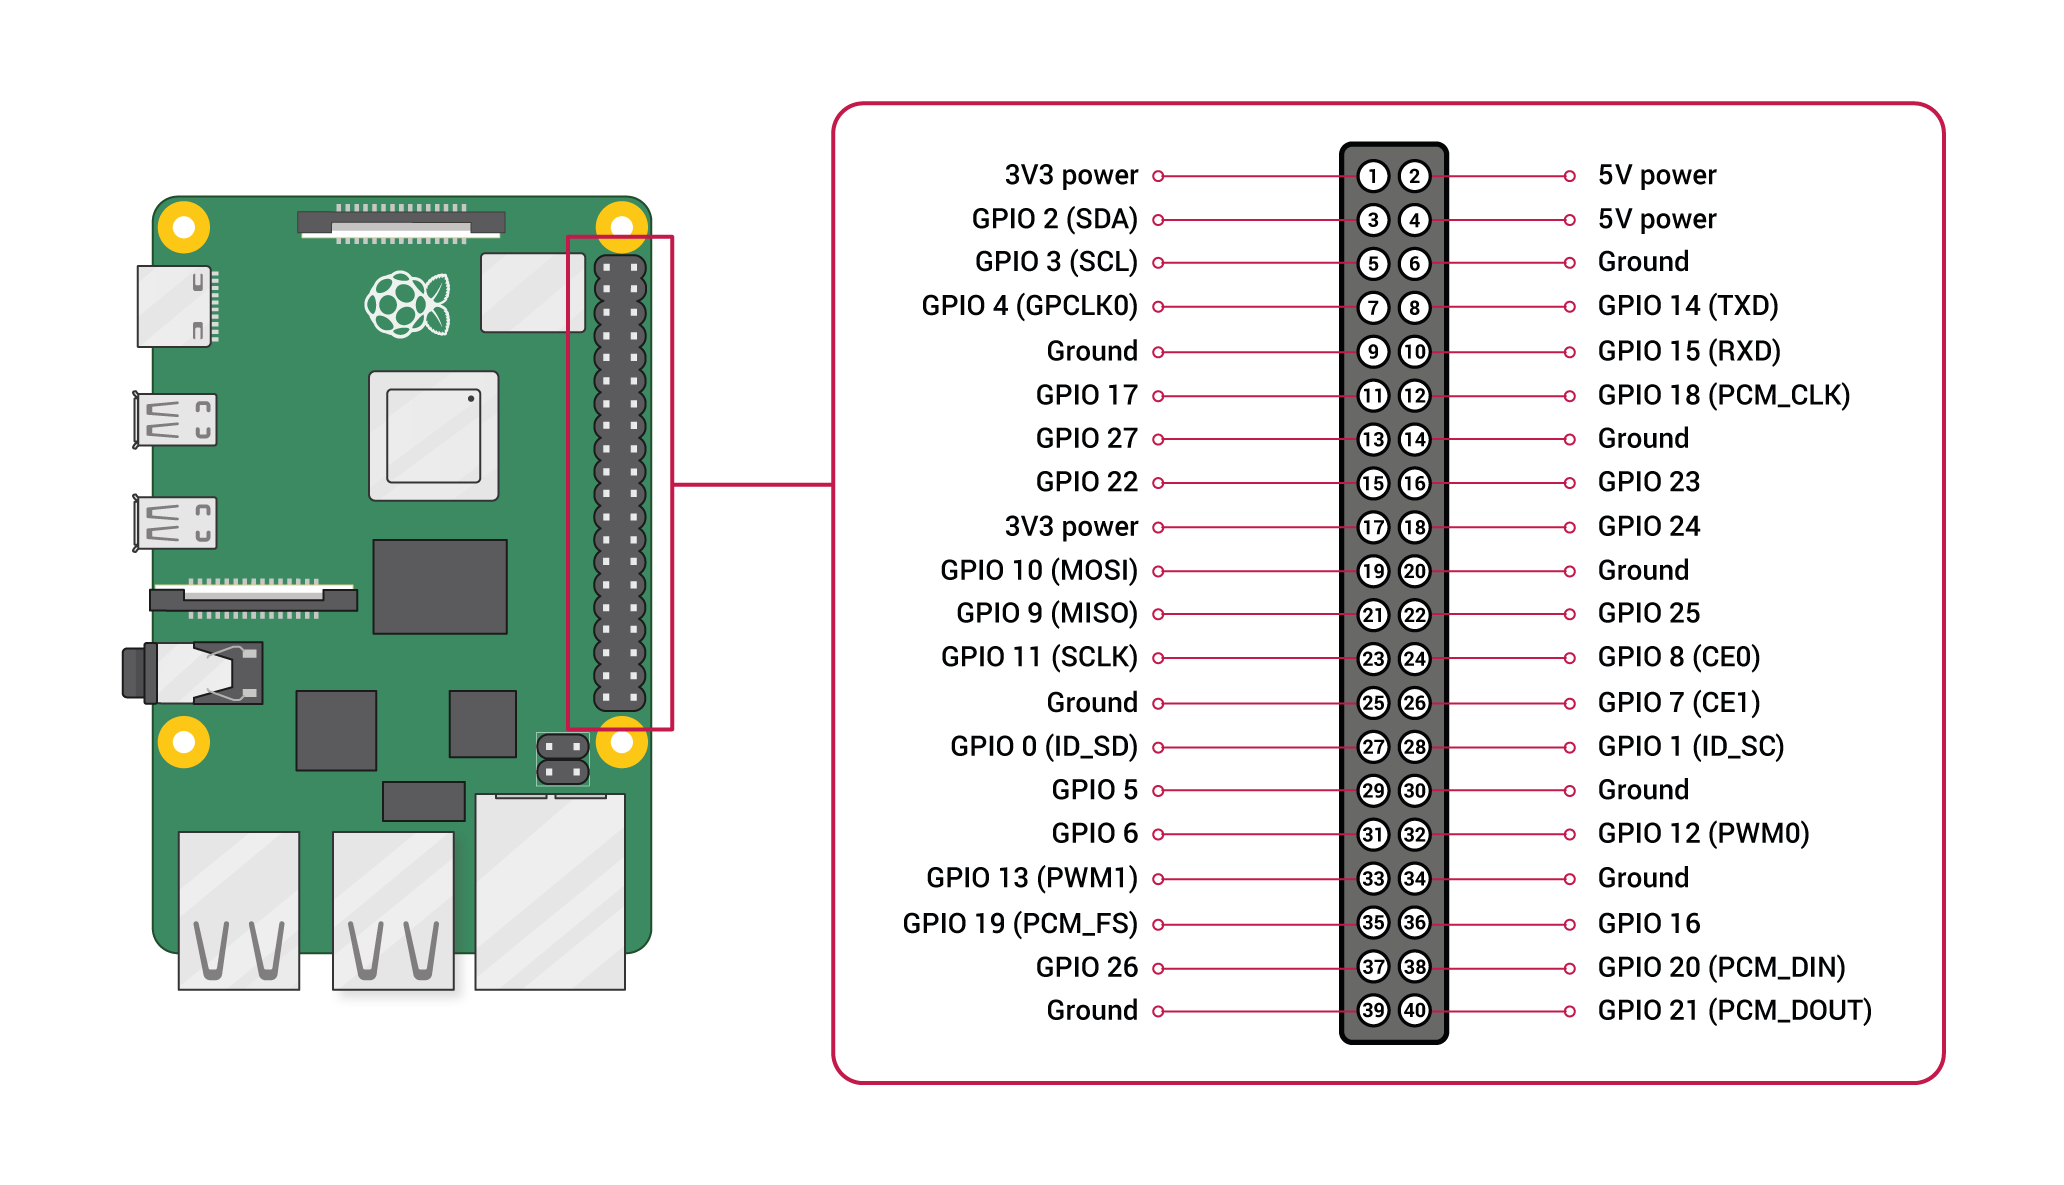
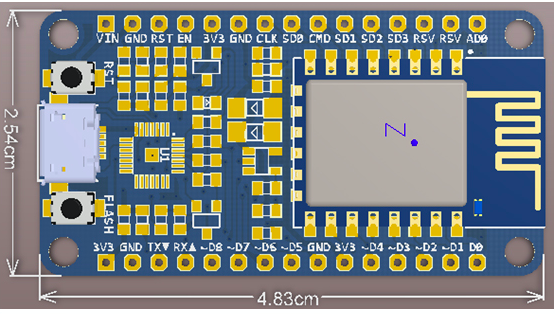
Connect these two with each other according to this map:
| PIN # | ESP12E | Raspberry Pi | PIN # |
|---|---|---|---|
| 02 | GND | Ground | 06 |
| 03 | TX | GPIO15 (RXD) | 10 |
| 04 | RX | GPIO14 (TXD) | 08 |
After power up, esplink works in AP+STA mode, scan for SSID with the name started
with ESP_xxx and connect to it, then head to 192.168.4.1 in your browser, the
home page should be like this:

esplink act as telnet server, you can view logs of the attached boards with nc
or telnet, but first thing need to do is to configure it to connect to wireless
router, connect with the default IP address is OK, but it’s more convenient to
make it connect to the same network as your computer.
Now connect to it with either nc or telnet:
$ nc esp-link.local 23
$ telnet esp-link.local
When using telnet, I noticed the duplicated character issue, press Ctrl + ],
then enter mode char to fix this, this is documented in the README of esplink.
Another way to view logs is through the µC Console tab.
Build the latest firmware
If you want to build the latest firmware from source code, esp-open-sdk and toolchain are required, download and unpacking:
mkdir ~/esplink; cd ~/esplink
wget -c http://s3.voneicken.com/xtensa-lx106-elf-20160330.tgx
tar xvf xtensa-lx106-elf-20160330.tgx
wget -c http://s3.voneicken.com/esp_iot_sdk_v2.1.0.tgx
tar xvf esp_iot_sdk_v2.1.0.tgx
Then setup SDK and XTENSA_TOOLS_ROOT path, which are required by the building
process:
export SDK=~/esplink/esp_iot_sdk_v2.1.0/
export XTENSA_TOOLS_ROOT=~/esplink/xtensa-lx106-elf/bin/
Now, clone the esp-link repo and build:
$ git clone --depth=1 https://github.com/jeelabs/esp-link.git
$ cd esp-link; make
$ ls firmware
user1.bin  user2.bin
Update firmware with OTA
esp-link support firmware update with OTA, you do not need to connect the module
with USB cable after the first setup, use make wiflash:
$ ESP_HOSTNAME=esp-link.local make wiflash

SDK     is /home/fdbai/esplink/esp_iot_sdk_v2.1.0
VERSION is v3.2.47.alpha.16-gcf329e8-dirty
build/httpd.user1.out  :
section            size         addr
.data              3362   1073643520
.rodata           19292   1073646896
.bss              39712   1073666192
.irom0.text      290484   1075843088
.text             31156   1074790400
Total            778422
    user1.bin uses 344372 bytes of 503808 available
./wiflash esp-link.local firmware/user1.bin firmware/user2.bin
Flashing user2.bin
  % Total    % Received % Xferd  Average Speed   Time    Time     Time  Current
                                 Dload  Upload   Total   Spent    Left  Speed
100  336k    0     0  100  336k      0  63796  0:00:05  0:00:05 --:--:-- 78355
Rebooting into new firmware
Waiting for ESP8266 to come back
Don’t wait this time, it will never happen, you need to connect to the default IP address and configure the wireless again.